
I'm really excited to start a new weekly feature every Monday here on the blog. The Sketchbook Projects are going to be a mix of fashion, styling, sewing, tutorials, etc. Each week, I will be sharing a page from my sketchbook along with a tutorial that was created/inspired by that page in the sketchbook.
So for the first set of projects I am going to focus on my favorite time of the year Fall fashion. Seriously, I can't wait to get my hands on all the September fashion issues out there (Vogue, W, Lucky, Bazaar, etc). When I was flipping through a few of the issues one of the trends that I noticed was lace. In general I am not a huge lace fan (seems way to girly usually to me), but for some reason it is starting to wear on me. I thought it would be fun to try and add a little bit of the lace trend to my fall wardrobe (without a huge money or time commitment). Also for the past few seasons: the whole wearing socks/tights with wedges or open-toed shoes in the cooler months has been in (I really love this trend and for me it never really seems to go out of style). So I thought it would be fun to mix the two (and try out the lace trend and see how I like it)...

Here is a look at the page in my sketchbook that inspired these socks (plus a few more projects that will probably never get done, but that are fun to think about):

For materials:

*I picked up the knee-highs at the dollar store, but I probably had some hiding in the drawer somewhere...
Step 1:

Start by laying the socks so the toes are facing opposite directions (as shown in the photo above) and measure the top of the sock for width and to get and idea of the length desired for the lace. (mine turned out to be 2 1/2" wide x 3" long)
Step 2:
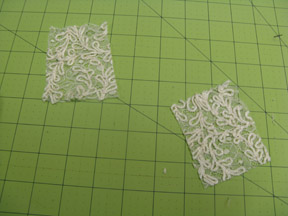
Cut out the lace to desired measurements (2 1/2" x 3" in this case). I am just using some scrap lace with an allover pattern and cut it into a rectangle.
Step 3:

Check to see if you like the lace (remember to keep your socks with the toes facing opposite directions) *you can always layer lace and/or wrap it around more of the socks, in this case I am just adding to the sides
Step 4:

To make the lace look a little more "natural" cut around the lace to give it some shape (look at the top sock for an example) and repeat with the other piece of lace.
Step 5:

Pin the lace to the top of the sock (only pin through the top layer ) and thread a needle with thread that matches the color of your lace.
Step 6:

Start by sewing the lace to the sock. Just start by taking the needle up through the back to the front (make sure you have a nice knot at the end of your thread and I did double up my thread)
Step 7:
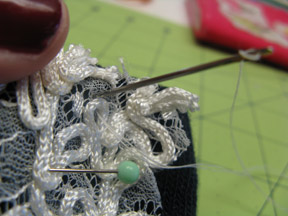
And then sew back tacking down part of the lace (the lace will be loosely tacked down and with washing will kind of curl up and add a little texture)
Step 8:

It's easier to do a little bit of a long running stitch to assist with the ease of sewing the lace down. (the thread will be easily seen inside the sock but since it is next to your skin it won't be visible).
Step 9:

repeat with the other sock (make sure that the toes are still facing opposite directions)
Step 10:

Add decorative buttons- here were some of the options I was playing with. I went with the last option because I thought it would go best with a pair of brown wedges that I had, but I really loved the mis-matched red buttons as well.
Here's some more photos of the socks in action:


You knew I was going to love those right? I am a big fan of knee socks.
ReplyDeleteCant wait to see what else you will show us.